Make Your Mark: Printmaking & Screenprinting Basics

Starting with Printmaking: A Beginner’s Guide to Screenprinting & Block Printing
Printmaking is the art of transferring ink to a surface — an exciting way to reproduce your original artwork multiple times. Whether you’re printing T-shirts, posters, greeting cards, or fine art, hand-printing methods like screenprinting and block printing make it possible to create stunning prints right at home.
What is Printmaking?
Printmaking involves creating an image on a surface and transferring it with ink. Two of the easiest ways to get started by hand are:
Screenprinting (Silkscreening or Serigraphy) — perfect for graphic images, text, and multiple copies.
Block Printing (Relief Printing) — ideal for bold, carved designs with a stamp-like effect.
Getting Started with Screenprinting
Screenprinting works by pushing ink through a mesh screen onto paper, fabric, or other surfaces. You’ll need:
-
Screenprinting inks
-
A squeegee
-
A stencil or image
-
A printing surface (paper, fabric, etc.)
-
A silkscreen frame (store-bought or DIY)
Paper Stencil Method
The easiest way to try screenprinting:
-
Cut your design out of paper, newspaper, or wax paper.
-
Tape the stencil under your screen frame.
-
Pour ink on top and use the squeegee to press ink through the open areas.
Best for short runs — up to 10–15 prints.
Screen Filler (Touche Resist) Method
A more durable stencil:
-
Brush on screen filler to block areas you don’t want to print.
-
Let dry — the uncoated areas allow ink through, creating your design.
This method prints your image in reverse.
Photographic Emulsion Method
For detailed line art or photos:
-
Coat your screen with light-sensitive emulsion.
-
Place a film positive of your image over the screen.
-
Expose to light — your design develops directly on the screen.
This is the method used in professional shops and gives the most detail.
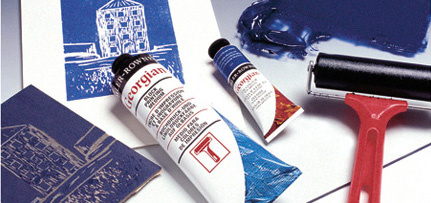
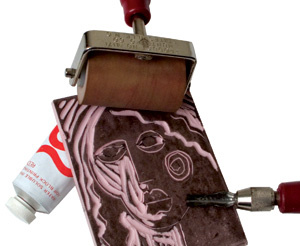
Getting Started with Block Printing
Block printing, or relief printing, is a simple, satisfying way to hand-print designs. You’ll need:
-
A block: linoleum, wood, plastic eraser block, or kid-friendly options like potatoes or foam.
-
Carving tools (different gouges/blades).
-
Printing inks (water- or oil-based).
-
A brayer (roller) to apply ink.
-
A baren (or the back of a spoon) to press the paper.
Drawing & Cutting Your Image
-
Sketch directly onto your block or transfer a design with tracing paper.
-
Remember: Carve letters in reverse!
-
Anything you carve away stays the color of the paper — the raised parts print.
Work from large to small gouges for best control.
Inking & Printing
-
Roll ink onto the block with a brayer for an even coat.
-
Place your paper on top.
-
Use a baren or spoon to rub firmly for smooth, even color.
-
Lift to reveal your print!
Helpful Hints for PrintmakingUse a sturdy, well-lit work surface. |
Final Thoughts
Printmaking is a satisfying way to turn your art into a series you can share, sell, or display. Experiment with simple stencils, blocks, or advanced emulsions — you’ll find endless creative ways to make your mark!
Leave a comment
Recent articles
View all
Paint, Glaze & Gild: Creative Faux Finishing at Home
From White to Wow: How to Paint & Dye Fabric Creatively